Trimming is a widely used video editing technique that shortens a video by cutting off unwanted parts from the beginning or end. It helps remove awkward intros, dead air, mistakes, or unnecessary footage to create a cleaner and more polished result. With better pacing and a more direct flow, your videos become more engaging and easier for viewers to watch.
If you're a Windows 10 user looking for ways to trim videos on Windows 10, this guide introduces three built-in tools that let you trim or cut videos for free. Keep reading to find the method that works best for you!
You may also interested in: 4 Best Tools to Crop MP4 Videos on Windows 10>>
How to Trim a Video on Windows 10 Using Built-in Tools
To help you trim videos on Windows 10 for free, Microsoft offers several built-in tools that make it easy to cut unwanted parts from the beginning or end of your videos. In this guide, we’ll walk you through Photos, Windows Media Player, and Clipchamp. Let’s get started!
#1 Trim Video on Windows 10 Using Photos
Photos is a built-in tool that offers a convenient way to view, edit and share photos on Windows. However, it can also be a quick and available option to trim videos on Windows 10 if you don't to download anything new.
Follow our simple guide to learn how to trim videos using the Photos app and save them as MP4 files in just a few clicks.
Step 1: Open the Photos App
Find the video you want to trim on your computer and right-click the file to open it with Photos.
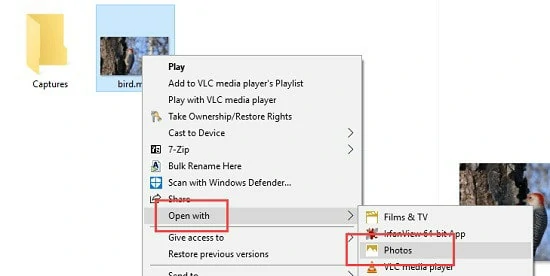
Open the File with Photos
Step 2: Adjust Settings
Once the video is loaded, click on the video and a menu bar will show on your screen. Here select "Edit & Create" > "Trim".
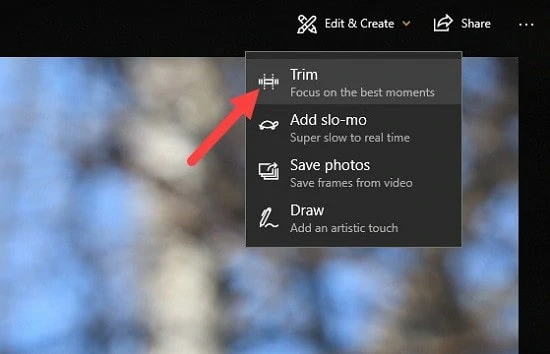
Find the Trim Button
Step 3: Choose the Trimming Section
Drag the left and right sliders to choose the section from the video. Only the segment between two sliders will be saved.

Select the Trim Selection
Step 4: Trim the Video
When the trimming section is set up, click on Save a copy on the top menu. The portion you select will be saved to a new file as the original with _Trim appended to its name. Depending on your preference, rename it as you like.

Trim and Save the Video
While Photos app offers basic video trimming, it has several notable limitations that might greatly affect your editing experience:
#2 Cut Videos in Windows 10 with Windows Media Player
To cut videos on Windows Media Player, you need to firstly install a third-part plugin named SolveigMM WMP Trimmer Plugin. This tool will turn your Windows Media Player into a multimedia editor. After that, do as following:
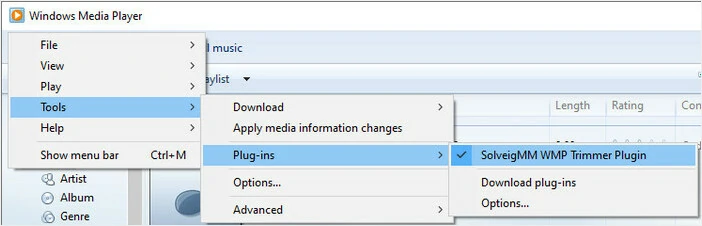
Trim Video on Windows with WMP Trimmer Plugin
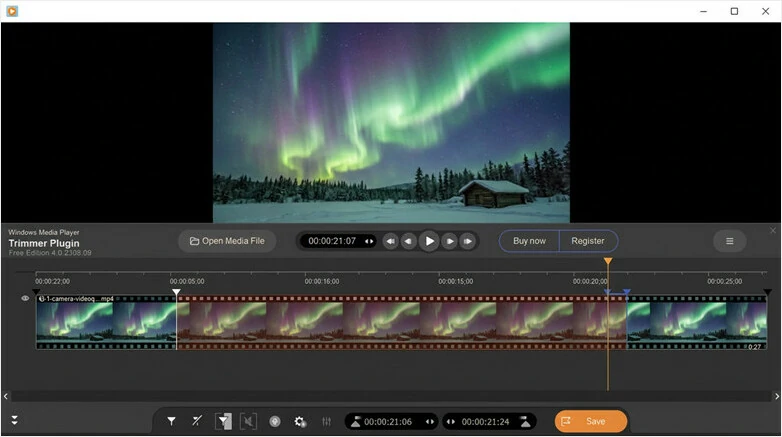
Save the Trimmed Video from Windows Media Player
While trimming in Windows Media Player is fairly straightforward, it still has some limitations that may affect your workflow:
#3 Trim Videos on Windows 10 with Clipchamp
Not satisfied with the solutions offered by Photos and Windows Media Player? No worries—Microsoft’s versatile video editor, Clipchamp, is here to help. With its user-friendly interface, you can easily trim the beginning or end of a video using simple sliders, or cut out the middle part with just a few clicks. Ready to try it? Here’s how to trim videos on Windows 10 using Clipchamp.
Trim Video on Windows 10 Using Clipchamp
Clipchamp offers more flexibility for trimming videos on Windows 10, but it also has a few limitations worth considering to give you a complete picture:
So, to ensure a smooth video trimming experience, we'd like to recommend a third-party professional video trimmer. This powerful tool lets you effortlessly trim, cut, split, and crop videos on Windows 10 without any quality loss or additional downloads. Plus, you'll get access to advanced editing features to take your videos to the next level! Let's dive in!
Powerful Video Trimmer for Windows 10 - FlexClip
FlexClip is an online video editor known for flexibility and simplicity. For basic trimming, cutting, or splitting, it provides easy-to-use tools within an intuitive interface, allowing even beginners to create cleaner videos with just a few simple clicks.
If you're trimming videos to capture share-worthy moments, FlexClip offers an AI-powered solution that can automatically analyze footage and generate highlight clips with your preferred aspect ratio, duration, and subtitle layout. No matter which method you choose, your video quality remains intact, and your personal data is protected from misuse. Now let's walk and see how to trim video on Windows 10 using FlexClip.
1) How to Trim or Cut Videos on Windows 10 Manually
Firstly, let's see the traditional way to trim your video in FlexClip. Click on Trim Videos Now to access FlexClip's video editor right now.

Step 1: Upload Your Video File
Click on Upload Files and import a video from local files, Google Drive, Google Photos, One Drive, Dropbox. Although FlexClip is used on a computer, you can easily upload videos stored on your phone to your desktop with a simple QR code scan—no cable transfer needed.
Meanwhile, our video trimmer supports almost all popular formats such as MOV, WEBM, M4V, and MP4. So feel free to add your video and trim on FlexClip
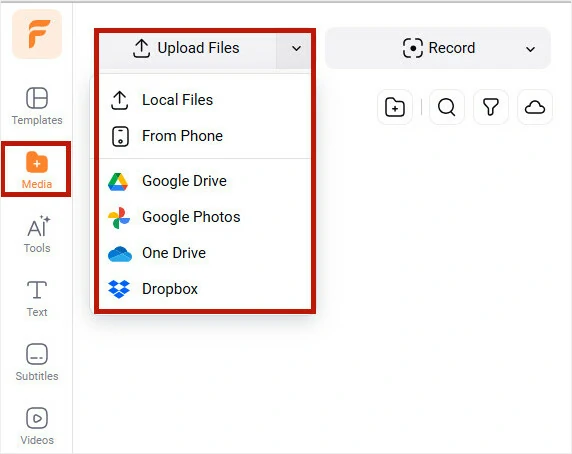
Upload the Video You Want to Trim to FlexClip
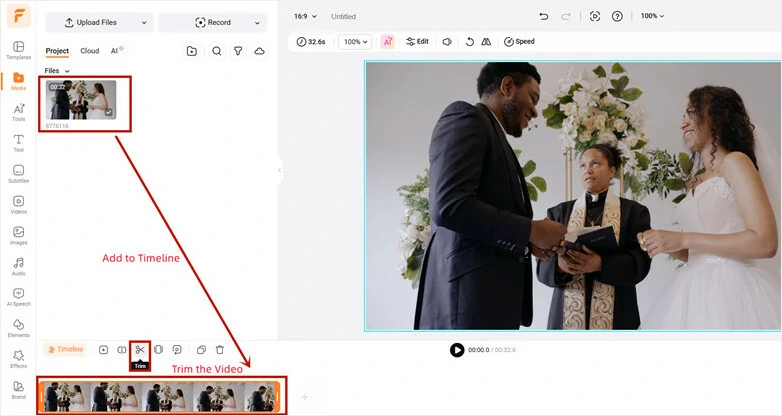
Step 2: Trim or Cut the Video
Add the video to timeline. Then tap Trim button and drag the edge towards the center of this video to trim off the beginning or ending part. Alternatively, you can also use Split feature to remove any unwanted parts in your videos.
Move the Trimmer Slider to Remove Unwanted Parts from Video
Alternatively, you can also use Split feature to remove middle clip or delete any unwanted parts in your videos. It's easy to make.
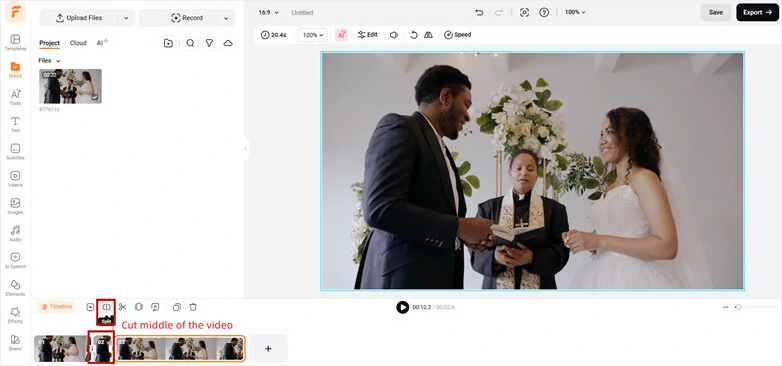
Split Clip to Cut Middle or Any Unwanted Part
Step 3: (Optional) Refine Trimmed Video with FlexClip's Versatile Features
Refine your trimmed clips with more personal touches. Feel free to add text, filter, background music, appealing overlays and more options to perfect your videos. Or utilize AI-powered tools like TTS for natural-sounding voiceover, AI music generator for one-of-a-kind tune, etc. Just explore and unleash creativity with ease.
Refine Trimmed Video with FlexClip's Versatile Features
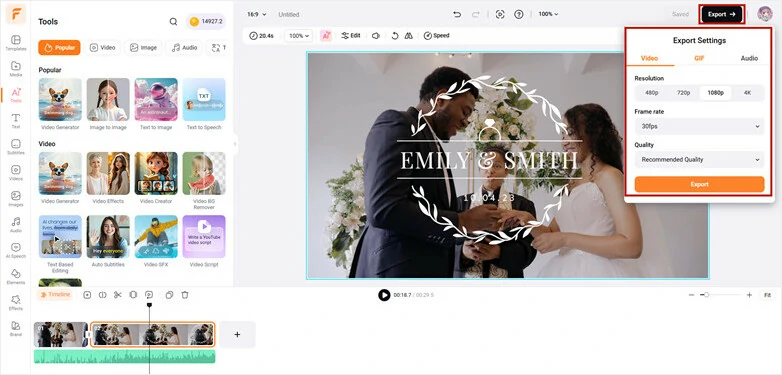
Step 4: Preview and Download Trimmed Video
You can preview the trimming result instantly. Once you're satisfied, tap the Export button to save it locally or share it on social media sites.
Preview and Download Trimmed Video
2) Trim Video on Windows 10 Automatically
No more manually trimming videos and guessing what will perform well. Let AI identify and trim the most share-worthy moments automatically. It analyzes hooks, reactions, and key highlights, then transforms them into engaging clips designed to boost viewer engagement. Click the “Trim Video Automatically” button below to learn how to trim videos on Windows 10 with AI.
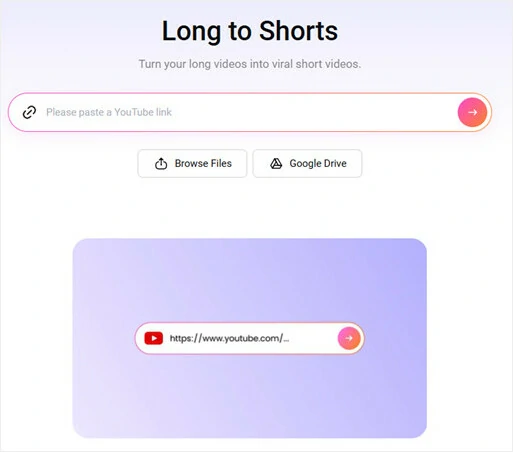
Step 1: Upload Your Video to FlexClip
Open FlexClip's AI Long-to-short converter right in your browser and import the video file.
Upload Your Video to FlexClip
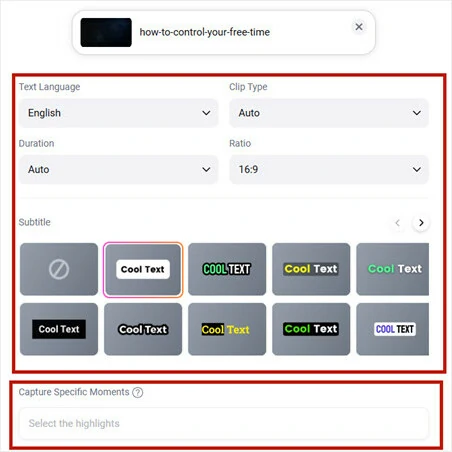
Step 2: Set Up Your Preference
Set the aspect ratio, then customize the text style, subtitle layout, clip duration, and clip type to match your needs. Once everything is set, click Generate and let AI do the rest. Or you can add Key words to select specific part.
Upload Your Video to FlexClip
Step 3: Edit or Download the AI Trimmed Clip
Once generated, you can preview all the trimmed clips. If you want to adjust the duration, simply click the Trim button to review the transcript and select the entire duration as needed. .
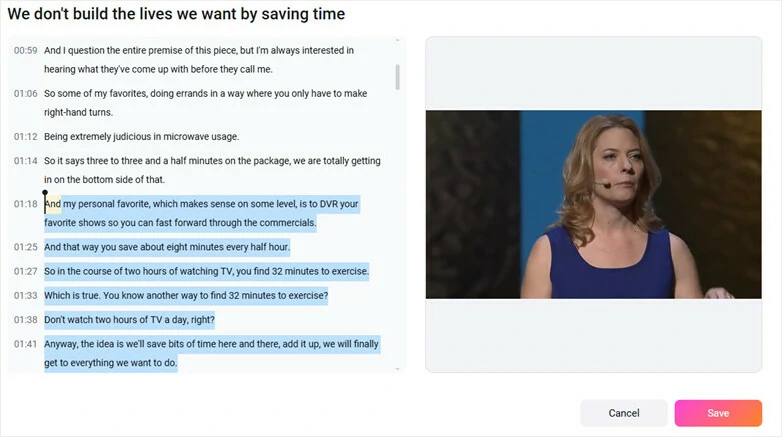
Edit the Trimmed Clip in FlexClip
When you're satisfied, you can click the download button to save the new trimmed video to your device or directly publish your video across popular social media platforms
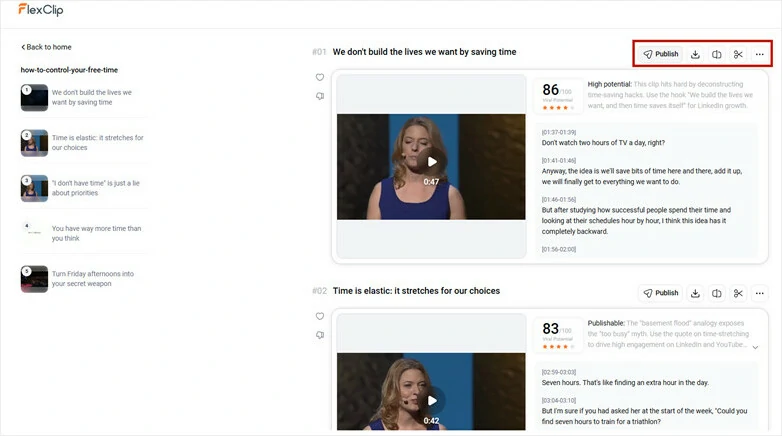
Download and Share the Trimmed Clip in FlexClip
FAQs About Trimming Videos on Windows 10
1. Can I trim MP4 videos on Windows 10?
Yes. The built-in apps support common formats like MP4, MOV, and WMV, making it suitable for most everyday video files.
2. What is the easiest way to trim videos on Windows 10?
FlexClip provides the easiest way to trim, cut, crop and split videos on Windows 10. Simply open FlexClip's editor page with your browser, upload your file to the timeline and trim unwanted part with a few clicks, then just export and download without any quality loss.
3. Can I undo trimming after saving?
Once saved as a new file, trimming cannot be undone unless you still have the original video. Always keep a backup before editing.
The Bottom Line
That's all how to trim video on Windows 10 for free. Follow the tutorial steps to trim unwanted segments from your videos now! By the way, FlexClip is the best option if you're looking for a flexible yet user-friendly trimmer online. Give it a try and let it surprise you!


FlexClip AI Video Maker
Reach professional-quality videos faster with easy editing tools, templates, and smart AI.
Start Now for Free
Hot & Trending
-

Best Ways to Find Music in YouTube Videos
-

Instagram Story Video Quality Bad After Upload? Fix It!
-

How to Repost Video on TikTok & How to Remove TikTok Repost
-

Improve Video Quality Online: 3 AI Video Quality Enhancers You Can't Miss
-

4K Convert to HD 1080p without Watermark: Best 4k Video Converters
-

Top 13 Birthday Video Makers with Music and Effects Free
-

How to Search Filters on TikTok & Use a Filter You See - TikTok Filter Guide
-

Large Collection of Creative and Funny Birthday Video Ideas for Ones You Care